
What Is Whitewashed Brick?
Whitewashed brick is a popular design technique that involves applying a translucent coating to brick surfaces, giving them a light, airy, and rustic appearance. This technique is commonly used to create a vintage or farmhouse-inspired look both inside and outside of homes. Whether you have unpainted brick or previously painted brick, whitewashing can be a great way to update and transform the look of your space. Here’s a step-by-step guide on how to whitewash brick for both interior and exterior applications.
Whitewashing Unpainted Brick
If you have unpainted brick, follow these steps to achieve a whitewashed finish:
Step 1: Whitewashing Exterior Brick
Before you begin, mask off windows, doors, and any other areas you don’t want to get paint on. This will help protect surrounding surfaces.
Step 2: Mix the Limewash Solution
To create the whitewash, mix equal parts of hydrated lime and water in a large container. Stir well to ensure a smooth and consistent solution. You can adjust the ratio depending on the desired opacity.
Step 3: Spray the Surface With Water
Before applying the limewash, spray the brick surface with water. This will help the limewash adhere properly and prevent the brick from absorbing too much moisture from the solution.
Step 4: Spray the Limewash
Using a sprayer or a brush, apply the limewash mixture to the brick surface. Work in small sections, ensuring even coverage. Allow the first coat to dry before applying additional coats for a more opaque finish.
Step 5: Distress the Finish (optional)
For a more weathered and aged appearance, you can distress the whitewashed brick by lightly sanding or scrubbing the surface with a stiff brush. This step is optional and can be adjusted based on your desired aesthetic.
Whitewashing Interior Unpainted Brick
If you have unpainted brick indoors, follow these steps to achieve a whitewashed look:
Step 1: Tarp and Tape Off Areas
Before you begin, protect surrounding surfaces by tarping and taping off areas that you don’t want to get paint on.
Step 2: Clean Brick
Clean the brick surface thoroughly using a mixture of water and mild detergent. This will help remove any dirt, dust, or grease that could interfere with the paint adhesion.
Step 3: Mix Paint
To create a whitewash effect, mix latex paint with water in a ratio of 1 part paint to 1 part water. Stir well to ensure the paint is well-diluted and has a consistent consistency.
Step 4: Test Paint and Create Key Area
Before applying the whitewash to the entire surface, test the paint mixture on a small, inconspicuous area of the brick to ensure you’re satisfied with the color and opacity. Once you’re happy with the test area, create a “key area” by applying a thin coat of the whitewash to a larger section of the brick.
Step 5: Whitewash Brick
Using a brush or roller, apply the whitewash mixture to the brick surface, working in small sections. Apply the paint in thin coats, allowing each coat to dry before applying additional layers for
a more opaque finish.
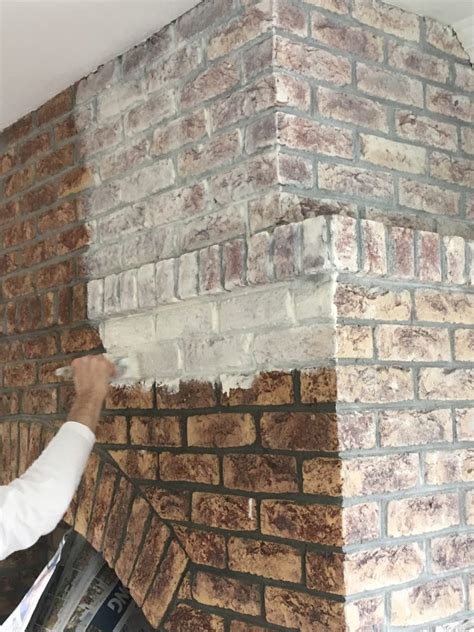
Whitewashing Interior Painted Brick
If you have previously painted brick indoors, follow these steps to achieve a whitewashed effect:
Step 1: Tape, Tarp, and Clean
Prepare the area by taping and tarping off surfaces you don’t want to get paint on. Clean the painted brick surface using a mixture of water and mild detergent to remove any dirt or grime.
Step 2: Cut Sponge
Cut a natural sea sponge into small, manageable pieces. This will be used to apply the whitewash.
Step 3: Mix Paint
Mix latex paint with water in a ratio of 1 part paint to 1 part water, similar to the process for unpainted interior brick. Stir well to ensure the paint is thoroughly diluted.
Step 4: Whitewash Brick With Sponge
Dip the cut sponge into the paint mixture and dab it onto the brick surface. Work in small sections, applying the paint with a light touch and blending it as desired. Allow each coat to dry before applying additional layers for more opacity.
Frequently Asked Questions (FAQs)
Q: Can I whitewash brick that has been previously sealed?
A: Yes, you can whitewash brick that has been previously sealed. However, it’s important to note that the level of porosity and the type of sealant used may affect the adhesion and overall appearance of the whitewash. It’s recommended to test the whitewash on a small area or consult with a professional if you’re unsure.
Q: Can I customize the color of the whitewash?
A: Absolutely! You can customize the color of the whitewash by adding small amounts of tint or pigment to the paint mixture. This allows you to achieve various shades and tones to suit your personal style and design preferences.
Q: How do I maintain and clean whitewashed brick?
A: To maintain and clean whitewashed brick, simply dust the surface regularly and wipe away any stains or spills with a damp cloth or mild detergent. Avoid using harsh chemicals or abrasive cleaners that could damage the whitewash finish.
Conclusion
Whitewashing brick can breathe new life into both interior and exterior spaces, creating a timeless and charming aesthetic. Whether you’re working with unpainted or previously painted brick, the step-by-step guide provided here offers a clear path to achieving the desired whitewashed effect. Remember to prepare the surface, mix the appropriate paint or limewash solution, and apply the whitewash in thin coats for the best results. With a little effort and creativity, you can transform your brick surfaces into stunning focal points that add character and warmth to your home.
Similar posts:
:max_bytes(150000):strip_icc()/what-is-the-difference-between-a-pergola-and-an-arbor-2736630-hero-68bb466d08ab490a81ad36b2b44cccdf.jpg) Understanding the Differences Between Arbors and Pergolas: Their Functions, Suitable Plants, and Historical Background
Understanding the Differences Between Arbors and Pergolas: Their Functions, Suitable Plants, and Historical Background
 Steps to Construct a Temporary Partition Wall
 Can hot water eliminate bacteria?
 How to Unclog a Toilet With a Plunger: A Step-by-Step Guide
 How to Repair a Carpet With Carpet Patching: Easy Steps for a Seamless Fix
 How to Apply a Venetian Plaster Wall Finish: Step-by-Step Guide