
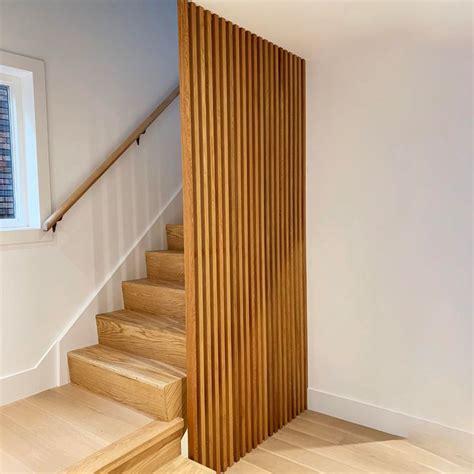
Are you looking to add a touch of warmth and character to your walls? Installing wood slats is a popular and stylish way to achieve a rustic and modern look. Whether you’re aiming for a full accent wall or just a small feature, this guide will walk you through the process of installing wood slats on a wall. From preparing the wall to finishing touches, we’ve got you covered.
Basics of Installing Wood Slats on a Wall
Before diving into the installation process, let’s familiarize ourselves with the basics:
- Building With Dimensional Lumber: Dimensional lumber refers to wood boards with specific thickness and width measurements. It is commonly used for constructing wood slat walls.
- Building With Sheet Goods: Sheet goods, such as plywood or MDF (medium-density fiberboard), can also be used for creating wood slat walls. They offer a smoother and more uniform surface.
Safety Considerations
Prior to starting any DIY project, it’s essential to prioritize safety. Here are a few safety considerations to keep in mind:
- Inspect Wall: Ensure that the wall is in good condition and free of any structural issues, water damage, or mold. Repair any necessary areas before proceeding.
- Plan Wood Slat Wall: Take accurate measurements of the wall and plan the layout of the wood slats. This will help you determine the quantity of materials needed and create a visually appealing design.
- Paint the Wall: If desired, paint the wall with a suitable primer or base color before installing the wood slats. This will prevent the wall color from showing through the gaps between the slats.
Installation Steps
Now, let’s dive into the step-by-step process of installing wood slats on a wall:
- Rip Wood Slats (Sheet Goods Only): If you’re using sheet goods like plywood or MDF, rip them into desired widths using a table saw or circular saw. This step is not required if you’re using dimensional lumber.
- Fill Large Voids: Fill any large gaps or voids in the wall with spackling compound or wood filler. Smooth out the surface and allow it to dry completely.
- Sand Wood Slats: Sand the wood slats to ensure a smooth finish. Start with a coarse-grit sandpaper and gradually move to finer grits for a polished result.
- Paint or Stain Wood Slats: Apply a coat of paint or stain to the wood slats, following the manufacturer’s instructions. This step can be done before or after installation, depending on your preference.
- Cut Ends of Wood Slats: Measure and mark the desired length for each wood slat. Use a miter saw or a circular saw to make clean and accurate cuts.
- Install Wood Slats: Begin by attaching the first slat at the desired height and level. Use a level to ensure straightness and secure the slat to the wall using a nail gun, screws, or adhesive. Continue attaching the remaining slats, leaving a small
gap between each for an aesthetic effect.
- Cut Around Obstacles: If you encounter obstacles such as electrical outlets or switches, use a jigsaw or hole saw to carefully cut openings in the wood slats for a seamless fit.
- Fill Nail Holes on Slats: Once all the slats are installed, fill the nail holes with wood filler. Smooth out the filler and allow it to dry before sanding the surface.
- Touch up the Slats: Apply touch-up paint or stain to any areas that require additional coverage or blending.
FAQs (Frequently Asked Questions)
1. Can wood slats be installed over existing drywall?
Yes, wood slats can be installed directly over existing drywall. Ensure that the drywall is in good condition and securely fastened to the wall. If necessary, make any repairs or address any issues before proceeding with the installation.
2. What type of wood is best for wood slat walls?
Various types of wood can be used for wood slat walls, including pine, cedar, and oak. Choose a wood species that fits your desired aesthetic and budget. Keep in mind that different woods have distinct characteristics in terms of color, grain, and durability.
3. Can wood slats be installed on textured walls?
While it is possible to install wood slats on textured walls, it may require additional steps. It is recommended to smooth out the texture by skim coating or applying a layer of drywall compound before installing the slats. This will provide a flat and even surface for better adhesion.
Conclusion
Installing wood slats on a wall can transform the ambiance of any room, adding warmth and visual interest. By following the steps outlined in this guide and considering the safety precautions, you can successfully complete this DIY project and enjoy the beautiful results. Get ready to enjoy a stunning wood slat wall that will elevate the style and character of your space.
Similar posts:
 Steps to Construct a Temporary Partition Wall
 How to Whitewash Brick: Interior and Exterior Guide
 How to Unclog a Toilet With a Plunger: A Step-by-Step Guide
 What is the expense involved in replacing a garbage disposal unit?
 Can hot water eliminate bacteria?
:max_bytes(150000):strip_icc()/what-is-the-difference-between-a-pergola-and-an-arbor-2736630-hero-68bb466d08ab490a81ad36b2b44cccdf.jpg) Understanding the Differences Between Arbors and Pergolas: Their Functions, Suitable Plants, and Historical Background
Understanding the Differences Between Arbors and Pergolas: Their Functions, Suitable Plants, and Historical Background