Painting a wall can transform the look and feel of a room, and with the right techniques, you can achieve professional-looking results. Whether you’re a seasoned DIY enthusiast or a beginner, this guide will walk you through the steps to paint a wall like a pro. From prepping the room to applying the paint, let’s dive in!
Remove Light Switch and Outlet Covers
Before you start painting, it’s essential to remove the light switch and outlet covers from the wall. Use a screwdriver to loosen the screws and carefully take off the covers. This step ensures that you can paint the wall evenly and neatly without getting paint on the covers.
Ask for Large-Scale Paint Swatches
Choosing the right paint color can be a daunting task. To make it easier, ask your local paint store for large-scale paint swatches or samples. These larger swatches will give you a better idea of how the color will look on your wall and help you make an informed decision.
Protect the Room
Before you start painting, take the time to protect the room from any potential paint splatters or spills. Cover the floors with drop cloths or plastic sheets and use painter’s tape to protect baseboards, trim, and any other areas you don’t want to paint.
Prep the Walls for Paint
Properly prepping the walls is crucial for achieving a smooth and professional finish. Start by cleaning the walls to remove any dirt, dust, or grease. Fill in any holes or cracks with spackling compound and sand the patched areas until they’re smooth. Finally, wipe down the walls with a damp cloth to ensure a clean surface for painting.
Line Your Paint Tray
For easy cleanup and to keep your paint tray in good condition, line it with a disposable paint tray liner or aluminum foil. This simple step will save you time and effort when it’s time to clean up after painting.
Cut in Walls and Ceilings
Cutting in refers to the process of painting the edges and corners of the walls and ceilings using a brush. This technique creates crisp lines and makes it easier to paint the larger areas with a roller. Start by cutting in around the edges, corners, and trim, using steady and precise brush strokes.
Paint Overlapping “W”s
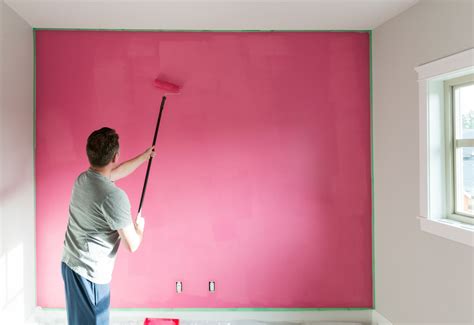
When using a roller to paint the larger areas of the wall, use the “W” technique. Begin by rolling the paint in the shape of a “W” on the wall. Then, fill in the gaps and continue rolling in a “W” pattern until the section is fully covered. This method helps distribute the paint evenly and minimizes streaks or lines.
Extend Your Reach When Painting
To paint high or hard-to-reach areas, use an extension pole for your roller. This allows you to maintain proper posture and reach areas that would otherwise be challenging. Attach the roller to the extension pole securely and paint with smooth, even strokes.
Wrap It Up
Once you’ve finished painting, it’s essential to properly clean and store your painting supplies. Remove any painter’s tape while the paint is still slightly wet to ensure clean lines. Clean your brushes, rollers, and trays according to the manufacturer’s instructions, and let them dry thoroughly before storing them for future use.
It’s recommended to wait at least two to four hours between coats of paint. This allows the previous coat to dry and ensures proper adhesion of the subsequent coat. However, check the paint can label for specific drying times as they may vary depending on the type and brand of paint. Priming is generally recommended, especially if you’re painting over a dark or heavily stained wall, or if you’re switching from an oil-based paint to a latex-based paint. Primer helps create a smooth surface, improves paint adhesion, and can enhance the durability and coverage of the paint. To clean painted walls, start by dusting them with a soft cloth or a duster to remove any loose dirt or debris. Then, gently wipe the walls with a sponge or cloth dampened with a mild soap and water solution. Avoid using abrasive cleaners or scrubbing too vigorously, as they can damage the paint. Always test any cleaning solution in an inconspicuous area first. By following these steps and tips, you’ll be able to paint a wall like a pro. Remember to prepare the room, protect surfaces, and use proper techniques for cutting in and rolling the paint. With patience and attention to detail, you’ll achieve a beautifully painted wall that enhances the aesthetics of your space.1. How long should I wait between coats of paint?
2. Do I need to use primer before painting?
3. How do I clean painted walls?
In Conclusion


:max_bytes(150000):strip_icc()/what-is-the-difference-between-a-pergola-and-an-arbor-2736630-hero-68bb466d08ab490a81ad36b2b44cccdf.jpg)