
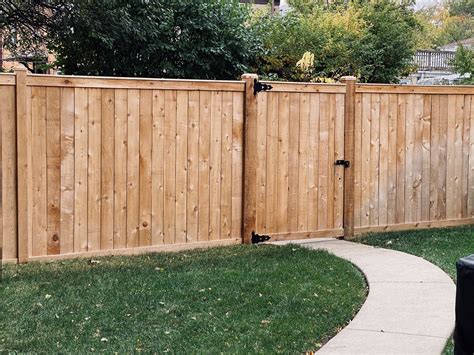
Best Way to Install Your Own Wood Fence
Installing a wood fence can be a rewarding project that adds privacy, security, and aesthetic appeal to your property. Whether you’re a seasoned DIY enthusiast or a beginner, here’s a step-by-step guide to help you install a wood fence the right way.
Fence Posts
The first step in building a wood fence is to determine the placement of your fence posts. These posts provide the structural support for the entire fence. Consider using pressure-treated wood posts that are resistant to rot and decay for durability.
Fence Panels
After determining the position of your fence posts, you’ll need to choose the type and style of fence panels that suit your needs. Fence panels come in various materials, designs, and sizes. Opt for high-quality panels made of durable wood to ensure longevity.
Building Tips to Get Started
Before you begin building your wood fence, there are a few important tips to keep in mind:
– Measure and plan the dimensions of your fence accurately.
– Check local building codes and regulations regarding fence installation.
– Ensure you have the necessary tools and materials for the project.
– Consider working with a partner for assistance, especially when handling heavy materials.
When to Build a Wood Fence
Wood fences can be built at any time of the year, but it’s ideal to choose a time when the weather is dry and mild. This helps to ensure that the ground is easier to work with and that your fence materials will have a solid foundation.
Safety Considerations
When installing a wood fence, safety should be a top priority. Here are a few safety considerations to keep in mind:
– Wear appropriate protective gear, such as gloves, safety glasses, and work boots.
– Use caution when handling tools and sharp objects.
– Be mindful of your surroundings and any underground utilities or cables that may be present.
How to Build a Wood Fence
Now, let’s walk through the step-by-step process of building a wood fence:
1. Plan Your Wood Fence
Before starting any construction, carefully plan the layout and design of your wood fence. Measure the perimeter and mark the locations for your fence posts.
2. Mark the Site for Buried Services
Before digging any post holes, it’s crucial to identify and mark the location of any buried services, such as water lines, gas lines, or electrical cables. This helps prevent any damage during the digging process.
3. Obtain a Permit
Depending on your local regulations, you may need to obtain a permit before building your wood fence. Check with your local municipality or homeowners association to ensure compliance with any permitting requirements.
4. Stake Out Fence Location
Using stakes and string, mark the outline of your fence, ensuring it aligns with your planned dimensions. This step helps you visualize the final result and ensures a straight and consistent fence line.
5. Dig the First Post Hole
Using a post hole digger or an auger, dig the first post hole at a depth that ensures stability and support for your fence. The depth may vary depending on your specific soil conditions and the desired height of your fence.
6. Dig All Other Post Holes
Continue digging the remaining post holes along the marked fence line, spacing them according to your chosen panel width. Use a level to ensure the posts are plumb and straight.
7. Add Base Fill
Place a few inches of gravel or crushed stone at the bottom of each post hole. This helps with drainage and prevents the wood from direct contact with the soil, reducing the risk of rot.
8. Set Posts in Concrete
Position the fence posts in the holes and fill the holes with concrete, ensuring the posts are level and aligned with each other. Allow the concrete to cure as per the manufacturer’s instructions before proceeding.
9. Place Fence Panels
Once the concrete has fully cured, attach the fence panels to the posts using appropriate fasteners. Ensure the panels are level and properly aligned for a clean and professional look.
10. Attach Fence Panels
Secure the fence panels to the posts using screws or nails, ensuring they are firmly attached. Double-check for any gaps or misalignments and make adjustments as needed.
11. Staining and Finishing
To protect and enhance the appearance of your wood fence, consider applying a stain or sealant. Follow the manufacturer’s instructions for proper application techniques and drying times.
Frequently Asked Questions (FAQ)
1. How long does it take to install a wood fence?
The time required to install a wood fence can vary depending on factors such as the size of the fence, the number of posts and panels, and your level of experience. On average, it can take several days to complete the installation.
2. Can I install a wood fence on my own?
Yes, many homeowners successfully install wood fences as a DIY project. However, it’s important to have basic carpentry skills, proper tools, and an understanding of the necessary steps and safety precautions involved.
3. Do I need to treat or protect my wood fence?
Treating or protecting your wood fence is recommended to enhance its durability and resistance to weathering. Applying a stain, sealant, or paint can help protect the wood from moisture, UV rays, and pests. Regular maintenance and inspections are also important to ensure the longevity of your fence.
Similar posts:
 Everything You Need to Know About Quartz Countertops: The Durable and Eco-Friendly Choice
 How to Install and Connect a New Dishwasher: A Step-by-Step Guide
 How to Install Shiplap on a Ceiling: A Step-by-Step Guide
 The Complete Guide: How to Drain Your Home’s Plumbing System
 How to Tell If a Wall Is Load-Bearing: A Comprehensive Guide
 How to Whitewash Brick: Interior and Exterior Guide