
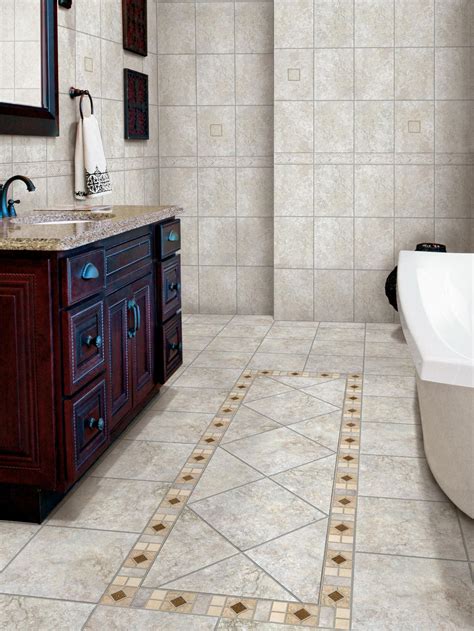
The Basics of Bathroom Floor Tiling
Are you looking to upgrade your bathroom and add a touch of elegance? Tiling the bathroom floor is a fantastic way to transform the space and create a clean and stylish look. Whether you’re a seasoned DIY enthusiast or a beginner, this step-by-step guide will help you achieve professional results.
Codes, Regulations, and Permits
Before starting any home improvement project, it’s crucial to familiarize yourself with local codes, regulations, and permit requirements. Depending on your area, there may be specific rules regarding flooring materials, waterproofing, and installation techniques. Contact your local building department to ensure you’re in compliance with the necessary guidelines.
Safety Considerations
Prioritizing safety is essential when working on any construction project. Here are a few safety considerations to keep in mind:
- Wear protective eyewear, gloves, and a dust mask.
- Use caution when handling sharp tools.
- Ensure the work area is well-ventilated.
- Follow manufacturer instructions for handling adhesives and grout.
Before You Begin
Proper planning and preparation are key to a successful bathroom floor tiling project. Consider the following steps before diving in:
- Determine if the current flooring should be removed or if the new tiles can be installed on top.
- Inspect the subfloor for any damage, ensuring it is clean, level, and structurally sound.
- Gather the necessary tools and materials, including tiles, adhesive, grout, a tile cutter, and a trowel.
How to Tile a Bathroom Floor
Follow these step-by-step instructions to tile your bathroom floor:
Determine if Current Floors Should Be Removed
Assess the existing flooring to determine if it needs to be removed. If the current floor is damaged, uneven, or made of materials that aren’t suitable for tiling, it’s best to remove it before proceeding.
Prepare the Subfloor
Clean the subfloor thoroughly, removing any dust, debris, or adhesive residue. Ensure the surface is level and repair any cracks or imperfections. A smooth and even subfloor is crucial for a professional-looking tile installation.
Install the Uncoupling Tile Membrane
An uncoupling tile membrane is a waterproof layer that helps prevent cracks in the tile caused by movement in the subfloor. Follow the manufacturer’s instructions to install the membrane, ensuring it covers the entire floor area.
Design the Tile Layout
Plan the layout of your tiles to ensure an aesthetically pleasing and balanced design. Consider starting from the center of the room and working your way out. Use a chalk line to create guidelines for accurate placement.
Dry-Fit the Tile Layout
Before applying adhesive, dry-fit the tiles to ensure they fit correctly and make any necessary adjustments. This step allows you to visualize the final result and make changes before permanently setting the tiles.
Cut the Door
Jambs
If the tiles won’t fit underneath the door jambs, use a handsaw or a jamb saw to trim them for a precise fit. This step ensures a seamless transition between the tile and the doorframe.
Fill the Tile Membrane Cavities
If your uncoupling tile membrane has cavities, fill them with a suitable mortar or adhesive according to the manufacturer’s instructions. This step ensures a solid and stable base for the tiles.
Install the Tiles With Thinset
Apply a layer of thinset adhesive to a small section of the subfloor using a notched trowel. Press the tiles firmly into place, following your predetermined layout. Continue this process until all the tiles are installed.
Cut the Tile
For tiles that require cutting to fit around edges, corners, or fixtures, use a tile cutter or a wet saw. Measure carefully and make precise cuts for a professional finish.
Apply Tile Grout
Once the tiles are set and the adhesive has dried, it’s time to apply the grout. Mix the grout according to the manufacturer’s instructions and use a grout float to fill the gaps between the tiles. Remove any excess grout using a damp sponge.
Remove the Grout Haze
After the grout has cured for a short while, typically around 20-30 minutes, use a clean, dry cloth to buff away any haze on the tile surface. This step reveals the true beauty of the tiles and ensures a polished appearance.
Seal the Grout
To protect the grout from stains and moisture, apply a grout sealer once it has fully dried. Follow the manufacturer’s instructions for proper application and allow sufficient time for the sealer to cure before using the bathroom.
FAQs (Frequently Asked Questions)
1. How long does it take to tile a bathroom floor?
The duration of the project depends on various factors, including the size of the bathroom, the complexity of the tile design, and your experience level. On average, tiling a standard-sized bathroom floor can take anywhere from one to three days.
2. Can I tile over an existing floor?
In some cases, it’s possible to tile over an existing floor if it’s in good condition and the height difference won’t cause issues with doors or fixtures. However, it’s crucial to assess the suitability of the current floor and ensure proper preparation to achieve a successful tile installation.
3. Do I need professional help to tile my bathroom floor?
Tiling a bathroom floor is a manageable DIY project for many homeowners. With careful planning, proper preparation, and following the step-by-step instructions, you can achieve professional-looking results. However, if you’re unsure about any aspect of the process or feel uncomfortable handling the project on your own, consulting a professional tile installer is always a good option.
Now that you’re armed with the knowledge and step-by-step guidance, you’re ready to embark on your bathroom floor tiling journey. Transform your bathroom into a stunning space that reflects your personal style and enjoy the satisfaction of a successful DIY project!
Similar posts:
 The Basics of Roof Replacement: Cost, Materials, and Process
 Eggshell vs. Semi-Gloss: Which Type of Paint Is Best Suited for Your Project?
 Quick and Easy Guide: How to Reset a Garbage Disposal for Smooth Functionality
 How to Create Your Own Linen Spray
 How to Replace a Shower Valve Cartridge: A Step-by-Step Guide
 How Much Firewood Is in a Cord and How to Store It