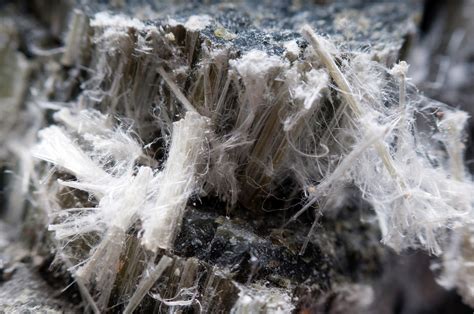
Asbestos is a hazardous material commonly found in homes built before the 1980s. If you suspect the presence of asbestos in your home, it’s important to test for it to ensure the safety of you and your family. In this comprehensive guide, we’ll walk you through the process of testing for asbestos using a DIY testing kit. Let’s get started!
What Is Asbestos?
Before we dive into the testing process, let’s understand what asbestos is. Asbestos is a naturally occurring mineral that was widely used in construction materials due to its strength and heat resistance. However, it was later discovered that asbestos fibers can cause severe health issues, including lung diseases and cancer, when inhaled.
Before You Begin
Prior to starting the testing process, keep the following in mind:
- Ensure your safety by wearing appropriate protective gear, including gloves, a respirator mask, and safety goggles.
- Read and carefully follow the instructions provided with the DIY asbestos testing kit.
- Choose a well-ventilated area to perform the testing.
How DIY Asbestos Test Kits Work
DIY asbestos test kits typically contain all the necessary materials and instructions to collect samples and send them to a certified laboratory for analysis. These kits are designed to provide accurate results and are a cost-effective option for homeowners.
Why You Might Find Asbestos in Your Home
Asbestos was commonly used in various building materials, especially those used for insulation, such as pipe insulation, floor tiles, and popcorn ceilings. If your home was built before the 1980s, there is a higher chance of asbestos-containing materials being present.
Common Places You Might Find Asbestos
Asbestos can be found in several areas of a home, including:
- Insulation materials
- Vinyl floor tiles
- Textured coatings (such as popcorn ceilings)
- Pipe insulation
- Cement roofing and siding
How to Test for Asbestos
Follow these steps to test for asbestos using a DIY testing kit:
Step 1: Wear Protective Gear
Put on the necessary protective gear, including gloves, a respirator mask, and safety goggles, to minimize your exposure to asbestos fibers.
Step 2: Prepare the Area
Choose a well-ventilated area and cover the surrounding surfaces with plastic sheets or newspaper to prevent any potential contamination.
Step 3: Collect Solid and Friable Materials
If you suspect solid materials, such as floor tiles or roofing shingles, gently scrape a small sample into a sealable plastic bag provided in the testing kit.
Step 4: Collect Dust Samples
To collect dust samples, use adhesive tape provided in the kit to wipe surfaces where asbestos-containing materials might be present. Place the tape in a separate sealable bag.
Step 5: Send Samples and Receive Results
Follow the instructions in the testing kit to package the samples securely. Send them to the designated laboratory for analysis. Once the samples are processed, you
will receive the results along with a comprehensive report detailing the presence or absence of asbestos.
How to Handle a Positive Asbestos Test
If your test results confirm the presence of asbestos, it is crucial to take appropriate steps to ensure your safety:
- Consult with a professional asbestos abatement contractor to develop a plan for safe removal and disposal of asbestos-containing materials.
- Follow local regulations and guidelines for asbestos removal to protect yourself and others.
- Avoid disturbing or damaging asbestos-containing materials to prevent the release of harmful fibers.
Frequently Asked Questions (FAQ)
Q: Are DIY asbestos test kits reliable?
A: Yes, DIY asbestos test kits are designed to provide accurate results when used correctly. However, it’s important to choose a reputable testing kit and follow the instructions carefully.
Q: Can I test for asbestos in all areas of my home?
A: While DIY asbestos test kits can help identify asbestos in various materials, it’s important to note that some materials may require professional testing due to the complexity of the sampling process.
Q: What should I do if I suspect asbestos but the test results are negative?
A: If you have strong reasons to believe asbestos is present in your home despite a negative test result, it’s recommended to consult with a professional asbestos inspector for further evaluation.
Conclusion
Testing for asbestos is crucial for ensuring a safe living environment. By following the step-by-step instructions provided in a DIY asbestos testing kit, you can identify the presence of asbestos in your home and take appropriate measures to protect yourself and your loved ones. Remember, safety should always be a top priority when dealing with potentially hazardous materials.


