
With more than twenty years of practical experience in renovating, repairing, and enhancing residences, Lee has been offering home improvement guidance for many years.
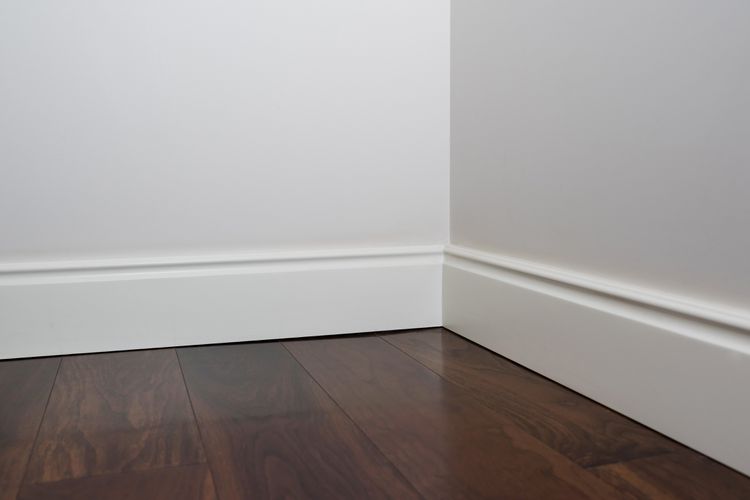
When it comes to installing baseboards, crown molding, and various millwork, achieving a seamless finish at corners is essential. While the long, straight sections are straightforward to fit, handling an inside corner presents a challenge. You have two choices for the joint: you can either cope it or miter it.
Mitering is typically the simplest and quickest method for novices, as it allows for all cuts to be made using an electric miter saw. However, numerous carpenters opt for coping the joint, as it yields a neater finish and reduces the likelihood of gaps.
There isn’t a one-size-fits-all solution for every project or individual. Explore the differences between mitered and coped joints for interior corners to determine which option suits your needs best.
Inner Corner and Outer Corner
An inside corner refers to a junction where two walls meet at a 90-degree angle, directing inward towards one another. This is different from an outside corner, where the walls extend outward at the same angle. Coped joints are suitable exclusively for inside corners, while mitered joints can be utilized for both inside and outside corners.
What is a Coped Joint?
A coped joint begins with a single molding component that maintains a square edge without any special cuts, fitting snugly against the wall. The adjacent piece that meets the corner is shaped to match the contour of the first piece. This second piece is positioned against the face of the first. The profile of the second trim piece is shaped using a coping saw or jigsaw.
Fundamentals of Coped Corners
Coping is a classic technique used in baseboard joinery and is regarded as a hallmark of skilled craftsmanship. Consequently, it is frequently favored for projects involving historical or period moldings.
- Carpenters and construction experts frequently favor coped joints since they are less prone to opening compared to miters when wood contracts in dry conditions.
- Coped joints require greater practice and expertise compared to mitered joints. In the case of mitered joints, the saw handles the cutting, and the most challenging aspect is ensuring precise measurements and cutting the molding to the correct length.
- Coping involves a distinct method and accurate cuts using a handsaw. After you become proficient in coping, it can be as quick as mitering, if not quicker, though it does require practice to reach that level of efficiency.
Tip
Coped joints are simpler to install since they are less influenced by uneven walls. Additionally, they handle out-of-square wall corners more effectively than miter joints, which need a precise 90-degree angle to fit correctly.
4 Reasons to Consider Coped Joints
The region is characterized by high humidity or is susceptible to moisture.
In regions with significant seasonal variations in humidity, it is advisable to utilize coped joints in conjunction with wood moldings. The pronounced seasonal changes increase the chances of corner joints becoming visibly separated, whereas coped joints are less prone to displaying such gaps.
You might prefer using coped joints for baseboards in areas susceptible to moisture, such as bathrooms.
The walls of the room are not perfectly square.
Numerous finish carpenters contend that coped joints are more effective in dealing with walls that are not perfectly square—where the surfaces do not align at a precise 90 degrees. Ideally, the two pieces should intersect at a 90-degree angle, but in situations where that isn’t possible, the coped board can be slightly angled without causing significant visual issues.
To Achieve a Refined Appearance
Period homes aiming to replicate the appearance of authentic craftsmanship will gain from employing historically precise joinery techniques, such as coped joints instead of mitered joints.
For Chair Rails and Crown Molding
Chair rails, crown molding, and other decorative elements positioned high on the walls are significantly more noticeable than baseboards located at the floor level. When these trims are likely to be closely examined, it is usually advisable to cope the joints for a more polished appearance.
Advantages and Disadvantages of Coped Corners
- Less likely to share personal thoughts or feelings.
- Ideal for non-standard wall shapes.
- Suitable for more prominent accents such as chair railings.
- Challenging to slice.
- Accurate labeling is essential.
- Difficult to repair if trimmed excessively.
Understanding a Mitered Corner
A miter joint is created by trimming the ends of the molding at 45-degree angles, allowing them to interlock and create a 90-degree internal corner.
This kind of joinery is commonly found in various picture frames and woodworking endeavors that necessitate precise 90-degree angles. To create a mitered joint, one can utilize either a power miter saw or a manual miter box along with a saw.
Fundamentals of Mitered Corners
There’s a good reason why both DIY enthusiasts and professional carpenters constructing standard homes opt for mitered corners in their moldings: they can be created swiftly and effortlessly with a power miter saw.
- A budget-friendly miter box paired with a manual miter saw can achieve precise miter cuts. Nonetheless, their capabilities are limited to 45-degree and 90-degree angles, and they are unable to handle custom angles.
- The primary disadvantage of mitered joints arises when you attach the molding to the wall, and one of the two pieces fails to stay vertical after being nailed; this can cause the miter joint to separate. For instance, if there is a significant amount of drywall compound at the base of the wall, it can cause the molding to tilt slightly backward, resulting in a gap at the top of the mitered joint.
Tip
Contemporary power miter saws equipped with precision blades efficiently slice moldings at precise angles, ideal for creating mitered joints.
4 Benefits of Using Mitered Joints
When Utilizing PVC or MDF Molding
Shrinkage is not a concern when it comes to polyurethane and MDF moldings, which means there is no need to cope the joints. Under typical circumstances, neither polyurethane nor MDF experiences expansion or contraction. However, it is important to note that direct exposure to water can lead to swelling or contraction in MDF.
When the Walls Are Rectangular
Interior corner walls seldom form a perfect 90-degree angle. However, some come closer to this ideal than others. When the angle falls within the 88 to 92-degree range, it becomes straightforward to adjust the miter saw to a setting between 44 and 46 degrees, or occasionally exactly at 45 degrees, to achieve an ideal cut.
When Skill Becomes a Concern
With a power miter saw, achieving a precise 45-degree cut is incredibly straightforward. Simply secure the saw at the desired angle, align the baseboard with the fence, and cut down to create a clean, open angle.
In comparison, coping requires skill and practice. It’s essential to keep the board stable. The blade of the coping saw can easily become misaligned within the handle. A minor misstep can cause the blade to veer off the intended pencil line.
In Situations Where Quickness Matters
For many homeowners, mastering the basic coping technique can take as long as it does to complete an entire room with mitered joints. Mitered joints offer the fastest approach to installing baseboards and other moldings that need to fit into inside corners.
Advantages and Disadvantages of Mitered Joints
- Easy to slice.
- Simpler to identify
- No need for manual cutting.
- It can be challenging to achieve a level alignment on certain walls.
- A joint has the ability to expand.
- A greater portion of the seam is visible from the top compared to the coped joints.
Similar posts:
 Mexican Feather Grass: A Guide to Cultivation and Maintenance
 What is the expense involved in replacing a garbage disposal unit?
 How to Install an Electrical Outlet Receptacle: A Step-by-Step Guide
 Steps to Construct a Temporary Partition Wall
 Ways to Eliminate Grape Juice Stains from Fabrics, Carpets, and Upholstered Surfaces
 Carpet on Stairs: How It’s Done and Pros and Cons