
How Do I Know if My Faucet Has an Aerator?
If you’re wondering whether your faucet has an aerator, there’s an easy way to check. Simply unscrew the tip of the faucet where the water comes out. If you see a small mesh-like screen, that’s the aerator.
What Is a Faucet Aerator’s Purpose?
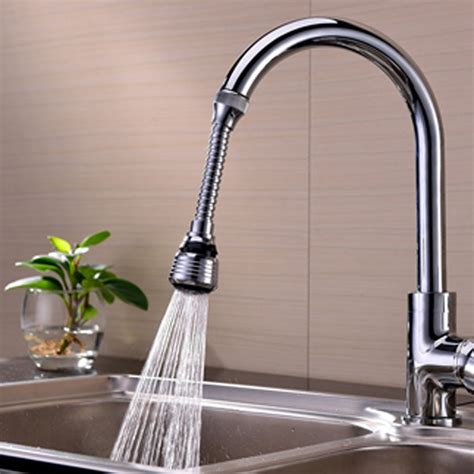
A faucet aerator is a small device that screws onto the end of a faucet spout. Its purpose is to introduce air into the water stream, creating a mix of air and water that reduces splashing and conserves water. The aerator also helps regulate the flow of water, making it more efficient and reducing the amount of water used without sacrificing performance.
How to Replace a Faucet Aerator
Over time, faucet aerators can become clogged or worn out, affecting their performance. Here’s how you can replace a faucet aerator:
Clean the Faucet
Before replacing the aerator, clean the faucet spout to remove any debris or buildup. Use a mild detergent or vinegar solution and a soft brush or cloth to gently scrub the spout.
Check the Aerator
Inspect the existing aerator for any damage or signs of clogging. If it’s clogged and cleaning doesn’t improve its performance, it’s time to replace it.
Position the Aerator
Take the new aerator and check if it has any washers or rubber gaskets. If it does, ensure they are properly positioned.
Screw on the Aerator
Carefully screw the new aerator onto the faucet spout. Start by hand to ensure proper alignment, and then use a wrench to tighten it slightly.
Tighten the Faucet Aerator
Use a wrench to give the aerator a final tightening. Be cautious not to overtighten, as it may cause damage.
Test the Faucet
Once the new aerator is securely in place, turn on the faucet to check for proper water flow. Ensure there are no leaks and that the water stream is smooth and controlled.
How to Clean a Faucet Aerator
Regular maintenance and cleaning of the faucet aerator are essential to keep it functioning optimally. Here’s how you can clean a faucet aerator:
1. Unscrew the aerator from the faucet spout using your hands or pliers.
2. Disassemble the aerator by carefully separating the different components.
3. Rinse each component under running water to remove any sediment or debris.
4. Use a small brush, such as an old toothbrush, to gently scrub away any stubborn deposits.
5. Soak the components in vinegar for 30 minutes to dissolve mineral buildup.
6. Rinse the components thoroughly with water to remove any traces of vinegar.
7. Reassemble the aerator and screw it back onto the faucet spout, ensuring it is properly aligned and tightened.
FAQs
1. Can I remove the aerator from my faucet?
Yes, you can remove the aerator from your faucet. However, keep in mind that the aerator serves important functions such as water conservation and reducing splashing. Removing it may alter the water flow and cause splashing.
2. How often should I clean my faucet aerator?
It’s recommended to clean your faucet aerator at least once every three to four months. However, if
you notice reduced water flow or irregular water spray, it’s a good idea to clean it more frequently.
3. Can I use any type of cleaner to clean my faucet aerator?
It’s best to use mild cleaners such as dish soap or vinegar to clean your faucet aerator. Avoid using harsh chemicals or abrasive cleaners as they can damage the aerator’s components.
Conclusion
A faucet aerator is a small yet essential component of your faucet that helps conserve water, reduce splashing, and improve water flow efficiency. By knowing how to replace and clean a faucet aerator, you can maintain its functionality and enjoy a smooth, controlled water stream. Regular maintenance ensures optimal performance and extends the lifespan of your faucet aerator.
Similar posts:
 How to Paint a Wall Like a Pro: A Step-by-Step Guide
 Steps to Repair a Non-Functional Light Switch
 Hostas Require Extra Attention in Autumn—Steps You Should Take Now for Thriving Plants
 How to Paint Tile: A Comprehensive Guide
 How a Furnace-Mounted Home Humidifier Works: A Comprehensive Guide
 What You Need to Know About Your Eaves: A Complete Guide