

Are you dreaming of building your own house from the ground up? Building your own home can be an incredibly rewarding and fulfilling experience. Not only does it allow you to customize every aspect of your living space, but it can
Should You Act as Your Own Contractor?
Understanding the Role of a Contractor
When embarking on a house-building project, one of the first decisions you’ll need to make is whether to act as your own contractor or hire a professional. Acting as your own contractor means taking on the responsibility of overseeing the entire construction process. This includes hiring and managing subcontractors, scheduling inspections, and ensuring that the project stays on track.
Pros and Cons of Acting as Your Own Contractor
Pros:
– Cost savings: By acting as your own contractor, you can potentially save a significant amount of money on labor costs.
– Control and customization: Being the contractor gives you full control over the design and construction process, allowing you to customize your home to your exact preferences.
– Learning experience: Building your own house can be a valuable learning experience, providing you with new skills and knowledge about construction.
Cons:
– Time commitment: Acting as your own contractor requires a substantial time commitment, as you will need to dedicate yourself to managing every aspect of the project.
– Complexity: Building a house involves various permits, codes, and regulations that can be complex to navigate, especially for those without prior construction experience.
– Risk and liability: As the contractor, you assume responsibility for any issues that may arise during the construction process, including potential delays and budget overruns.
Seeking Professional Assistance
If you decide that acting as your own contractor is not the right choice for you, it’s essential to hire a reputable contractor who understands your vision and can bring it to life. A professional contractor will have the necessary expertise and experience to handle the complexities of the construction process, ensuring a smooth and successful build.
Save Money With Sweat Equity
What is Sweat Equity?
Sweat equity refers to the contribution of your own physical labor and time towards the construction of your home. By taking on some of the tasks typically performed by hired professionals, you can save a considerable amount of money.
Tasks You Can Take On
There are various tasks that you can consider tackling yourself to save money:
1. Site preparation: Clearing the land, excavating, and preparing the foundation.
2. Painting: Interior and exterior painting can be time-consuming but is relatively straightforward and can yield significant savings.
3. Landscaping: Designing and creating your own outdoor spaces can add a personal touch to your home while saving money on professional landscaping services.
Knowing Your Limits
While sweat equity can help save money, it’s important to recognize your own limitations. Some tasks require specialized skills and equipment, and attempting them without proper knowledge can lead to costly mistakes or safety hazards. Be realistic about your abilities and consider hiring professionals for complex or high-risk tasks.
Prepare the Home Site
Choosing the Right Location
The first step in building your own house is finding the perfect location. Consider factors such as proximity to amenities, schools, and work, as well as the overall suitability of the land for construction.
Obtaining Permits and Clearing the Land
Before you can start construction, you’ll need to obtain the necessary permits from your local government. These permits ensure that your construction meets all safety and building code requirements. Once you have the permits in place, you can begin clearing the land, removing any trees, rocks, or debris that may interfere with the construction process.
Preparing the Foundation
Once the land is cleared, it’s
time to prepare the foundation. This involves excavating the site and creating the footings that will support your home’s structure. It’s crucial to follow the architectural plans and consult with professionals during this stage to ensure the foundation is solid and level.
By following these initial steps, you’ll be on your way to building your dream home from the ground up. Stay tuned for the next part of our step-by-step guide, where we will cover pouring concrete footings and foundation, installing plumbing and electrical systems, and more.
Pour Concrete Footings and Foundation
Preparing for Concrete Pouring
Before pouring concrete, it’s important to ensure that the site is properly prepared. This includes creating formwork, which acts as a mold for the concrete, and installing rebar for reinforcement. The formwork should be secured and level to ensure the concrete sets properly.
Pouring the Footings
Footings are the base of the foundation and provide stability for the entire structure. Concrete footings are typically wider at the bottom to distribute the weight evenly. The concrete is poured into the formwork, and professionals will ensure that it is leveled and aligned according to the architectural plans.
Constructing the Foundation Walls
Once the footings have cured, the next step is to construct the foundation walls. This involves pouring concrete into the formwork, allowing it to set, and then removing the formwork once the concrete is strong enough. The foundation walls provide support and stability to the entire house structure.
Install Plumbing and Electrical
Planning the Plumbing System
Before starting the installation process, it’s essential to have a detailed plan for the plumbing system. This includes determining the location of pipes, fixtures, and drains. Consult with a professional plumber to ensure that your design meets local building codes and regulations.
Installing Plumbing Lines
The installation of plumbing lines involves laying out and connecting water supply lines, drain lines, and vent pipes. This should be done in accordance with the plumbing plan. It is crucial to perform pressure tests to check for any leaks or issues before proceeding to the next steps.
Electrical Wiring and Outlets
Similarly, a well-planned electrical system is vital for your home’s functionality and safety. Consult with an electrician to develop an electrical plan that meets your needs and adheres to electrical codes. The wiring should be installed carefully, ensuring proper grounding and following safety guidelines. Outlets, switches, and fixtures are then connected and installed.
Pour the Concrete Slab
Preparing for the Concrete Slab
The concrete slab serves as the base for the ground floor of your home. Before pouring the concrete, the site needs to be properly prepared. This involves compacting the soil, adding a layer of gravel or crushed stone for drainage, and installing a moisture barrier to prevent moisture from seeping through the slab.
Pouring and Leveling the Concrete
Once the site is prepared, concrete can be poured onto the prepared area. The concrete is spread and leveled to create a smooth and even surface. Professionals use screeds and floats to ensure that the concrete is level and free from any imperfections. It’s important to allow the concrete slab sufficient time to cure and strengthen before proceeding with the construction process.
Frame, Side, and Roof the House
Building the Framework
The framework, also known as the skeleton of the house, provides the structure and support for the walls, floors, and roof. This is typically constructed using wooden or steel beams and columns. Precise measurements and careful assembly are crucial to ensure the stability and durability of the framework.
Siding the House
Siding not only enhances the aesthetic appeal of your home but also serves as a protective barrier against the elements. There are various siding options available, including vinyl, wood, and fiber cement. Follow the manufacturer’s instructions and consult professionals for proper installation techniques.
Roof Installation
The roof plays a vital role in protecting your home from weather conditions. Whether you
choose shingles, metal roofing, or another material, proper installation is essential. This includes ensuring proper ventilation, insulation, and flashing to prevent leaks and maintain energy efficiency.
Install Electrical, Plumbing, and Insulation
Electrical Fixtures and Connections
Once the framework and siding are in place, it’s time to install electrical fixtures, including switches, outlets, and light fixtures. A licensed electrician should handle this part of the process to ensure compliance with electrical codes and to guarantee safety.
Plumbing Fixtures and Connections
Plumbing fixtures, such as sinks, toilets, showers, and bathtubs, are installed and connected to the plumbing lines. This involves ensuring proper sealing, alignment, and functionality. It’s recommended to consult with a professional plumber for precise installation.
Insulating the House
Insulation is essential for maintaining a comfortable and energy-efficient home. It helps regulate temperature, reduce noise transmission, and lower energy costs. Different areas of the house may require different types of insulation, such as batt, blown-in, or spray foam insulation. Proper installation techniques are crucial to maximize the effectiveness of insulation.
Hang Drywall and Install Trim
Hanging Drywall
Drywall installation involves attaching large sheets of gypsum board to the framework to create interior walls. Proper measuring, cutting, and securing techniques are necessary to achieve a seamless and smooth finish. Drywall joints are then taped, mudded, and sanded for a polished appearance.
Installing Trim and Molding
Trim and molding add a finishing touch to your home’s interior. This includes baseboards, crown molding, door casings, and window trim. Precise measurements, cutting angles, and proper installation techniques are essential to achieve a professional and cohesive look.
Paint the Walls and Perform Finish Work
Preparing the Surfaces
Before painting, it’s crucial to prepare the walls by cleaning, sanding, and priming them. This ensures proper adhesion and a smooth finish. Repair any imperfections, such as holes or cracks, and apply putty or caulk as needed.
Choosing Colors and Painting
Selecting colors that complement your style and create the desired atmosphere is an exciting part of the process. Apply paint carefully, using appropriate techniques such as rolling, cutting in, and edging. Multiple coats may be necessary for full coverage and a professional finish.
Finish Work
Finish work involves completing details such as installing doors, trim, and cabinets. This includes hanging doors, attaching hardware, and ensuring proper alignment. Installing kitchen cabinets, bathroom fixtures, and other finishing touches adds functionality and beauty to your home.
Install the Flooring
Choosing Flooring Materials
Selecting the right flooring materials for each room is crucial. Consider factors such as durability, style, maintenance requirements, and budget. Common flooring options include hardwood, laminate, tile, carpet, and vinyl.
Installation Techniques
Each flooring material has its own installation techniques, whether it involves gluing, nailing, or clicking the pieces together. Follow manufacturer instructions and hire professionals when necessary to ensure a high-quality and properly installed floor.
Final Home-Building Matters
Inspections and Final Touches
Before moving into your new home, it’s important to schedule and pass all necessary inspections. These inspections typically cover electrical, plumbing, and structural aspects to ensure compliance with building codes. Address any issues identified during the inspections and complete final touches.
Final Walkthrough and Documentation
Perform a thorough walkthrough of your completed home to check for any remaining items that need attention. Create a checklist and ensure that everything meets your expectations. Keep documentation of warranties, permits, and other important paperwork related to the construction process.
Celebrate Your Achievement
Building your own house is an incredible accomplishment. Take the time to celebrate and enjoy your new home. You’ve put in hard work, dedication, and personal touch into creating a space that truly reflects your vision.
FAQ
1. Can I build my own house if I have no construction experience?
While it is possible to build your own house without prior construction experience, it is recommended to acquire some knowledge or consult professionals for guidance. Taking construction courses, working alongside experienced builders, or hiring a consultant can provide valuable insights and help you avoid costly mistakes.
2. How long does it take to build your own house?
The timeline for building a house varies depending on factors such as the size of the home, complexity of the design, availability of labor and materials, and weather conditions. On average, the construction process can take anywhere from several months to over a year.
3. Can I save money by building my own house?
Building your own house can potentially save you money, especially if you take on tasks yourself and act as your own contractor. However, it’s essential to carefully plan, budget, and consider all costs involved, including materials, permits, labor, and unforeseen expenses. Proper research and realistic expectations are key to maximizing cost savings.
With these steps, tips, and FAQs in mind, you’re now equipped with a basic understanding of how to build your own house. Remember to consult professionals, acquire necessary permits, and follow safety guidelines throughout the process. Good luck on your exciting home-building journey!
Similar posts:
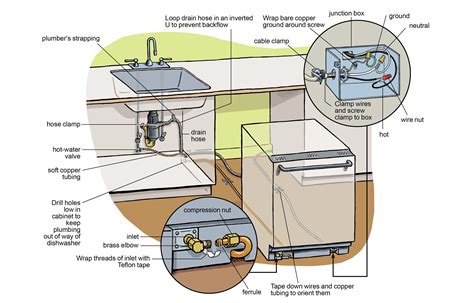 How to Install and Connect a New Dishwasher: A Step-by-Step Guide
 How to Tell If a Wall Is Load-Bearing: A Comprehensive Guide
 How to Paint a Bathroom the Right Way: A Step-by-Step Guide
 Granny Chic Style: Essential Tips for Achieving This Aesthetic in Your Home
 How to Replace Garage Door Springs: Torsion and Extension
 How to Fix a Garbage Disposal: Problems & Solutions