
Before You Begin
1. Check the Floor and Walls
Before installing wall tiles, ensure that the floor and walls are structurally sound and free from any damage or moisture issues. Repair any existing problems before proceeding with the tile installation.
2. Plan the Wall Tile Layout
Take measurements of the wall area and plan the layout of the tiles. Consider the size and shape of the tiles, as well as any patterns or designs you wish to create. This will help you determine the quantity of tiles needed and ensure a visually pleasing result.
Prepare the Wall
1. Install the Cement Backer Board
If the existing wall surface is not suitable for tile installation, such as in the case of drywall, it is necessary to install a cement backer board. Follow the manufacturer’s instructions to secure the backer board to the wall, ensuring a sturdy and stable surface for the tiles.
2. Dry-Lay the Tiles on the Floor
Before applying the adhesive, arrange the tiles on the floor in the planned layout. This dry-lay method allows you to visualize the pattern and make any necessary adjustments before permanently adhering the tiles to the wall.
3. Add a Batten Board
To ensure level and straight tile installation, attach a temporary batten board horizontally along the bottom edge of the wall. Use a level to ensure it is straight and adjust as needed.
Spread Thinset Mortar
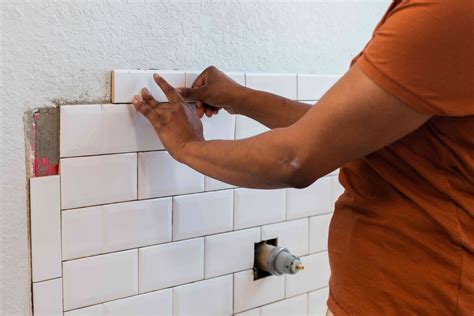
1. Lay the Wall Tiles
Starting from the bottom, apply a layer of thinset mortar to a small section of the wall using a notched trowel. Press the tiles firmly into the mortar, following the predetermined layout. Work in small sections to prevent the mortar from drying too quickly.
2. Add Tile Spacers
Place tile spacers between the tiles to ensure consistent spacing and alignment. Adjust the tiles as needed to achieve a uniform appearance.
3. Cut the Tiles
When reaching edges, corners, or fixtures, measure and cut tiles accordingly using a tile cutter or wet saw. Take precise measurements and use appropriate safety precautions when cutting the tiles.
Let the Thinset Cure
Allow the thinset mortar to cure according to the manufacturer’s instructions. This usually takes 24 to 48 hours, but it may vary depending on the type of mortar used. Avoid disturbing or applying pressure to the tiles during this curing period.
Apply Grout to the Wall Tile
1. Prepare the Grout
Mix the grout according to the manufacturer’s instructions, ensuring the consistency is appropriate for spreading.
2. Apply the Grout
Using a grout float, spread the grout diagonally across the tiles, making sure to fill all the gaps. Remove excess grout with the float at a 45-degree angle, being careful not to dislodge the tiles.
3. Clean the Tiles
Once the grout has partially cured, use a damp sponge to wipe away any grout haze from the surface of the tiles. Rinse the sponge frequently and continue cleaning until the tiles are free from residue.
When to Call a Professional
While installing wall tiles can be a DIY project, there are instances where professional help may be required. Consider contacting a professional if:
– The wall surface requires extensive repair or modification
.
– You encounter unexpected issues or challenges during the installation process.
– You lack the necessary tools or skills for tile installation.
– The project involves complex patterns or designs that require specialized expertise.
FAQ
1. Can I install wall tiles over existing tiles?
In some cases, it is possible to install new tiles over existing tiles. However, it is important to ensure that the existing tiles are firmly adhered and in good condition. Additionally, the added layer of new tiles may affect the overall thickness and appearance, so careful consideration and proper preparation are necessary.
2. How do I clean and maintain wall tiles?
To clean wall tiles, use a mild detergent or tile cleaner and a soft cloth or sponge. Avoid abrasive materials or harsh chemicals that may damage the tiles. Regular maintenance includes wiping away soap scum or stains and periodically resealing grout lines to prevent discoloration or moisture penetration.
3. How long does it take for the grout to fully cure?
Grout typically takes about 24 to 48 hours to cure, but it may vary depending on factors such as temperature and humidity. During this curing period, avoid excessive moisture exposure and minimize foot traffic on the tiled surface to allow the grout to fully harden and set.
Similar posts:
 Eggshell vs. Semi-Gloss: Which Type of Paint Is Best Suited for Your Project?
 The Basics of Roof Replacement: Cost, Materials, and Process
 Methods for Checking Hard Water Levels
 Quick and Easy Guide: How to Reset a Garbage Disposal for Smooth Functionality
 Transform Your Walls: How to Texture a Wall With a Roller
 Ways to Eliminate Grape Juice Stains from Fabrics, Carpets, and Upholstered Surfaces